


If you're someone who struggles with biting your nails, you're not alone. Many people have this hard-to-break habit. Not only does it look unsightly, but it can also be painful and lead to infections. That's why getting an acrylic overlay can be revolutionary! It not only protects your nails while they grow, but it also gives you a beautiful manicure. So yes, you can get acrylics on bitten nails!
The good news is that if your natural nails have a healthy nail bed, sides, and cuticle, you can wear acrylics. It doesn’t matter if they are very short to begin with. In fact, it’s best to start with short tips to get used to them. It’s less tempting to try to peel them off and they will be easier to balance on the natural nails.
If you’re committed to stopping biting your nails, it might also help to wear polish in vibrant colors to remind yourself not to leave them alone.
However, acrylics may seem like a daunting task to do at home. It’s definitely easier to get them done at the salon. However, if you want to experiment with them, you'll need an acrylic kit or the right supplies. If you’d rather get everything you need in one place, the Young Nails ultimate pro acrylic kit has it all.
The Difference Between Acrylic Overlays and Acrylic Tips
There are two ways to enjoy acrylics on your nails. The first is to cover the natural nail with acrylic to reinforce the nail without adding length. That’s called an overlay.
The second is to lengthen the nail with acrylic. This is done by sculpting extensions with the help of a form.
If the nails are bitten very short, you might want to do overlays with a bit of extension to make the manicure look natural. As the natural nail grows out, a nail tech can fill in the gap between the acrylics and the cuticle to maintain the natural appearance.
How to Do Acrylics at Home
With acrylics, you don’t need a nail lamp. The monomer air-dries. However, it’s crucial to properly prepare the nails and use the right tools to apply the acrylics. Here are the basics you need:
- Liquid monomer, the substance that activates the acrylic powder.
- Acrylic brush, usually made with sable hair, designed for use with monomer.
- Dappen dish made out of glass for holding the monomer once it’s decanted.
- Nail dehydrator to remove excess oil and moisture from the natural nails.
- Nail primer, preferably acid-free.
- Acrylic powder available in transparent, nude, and a rainbow of colors.
- Any additional nail art supplies like glitter if desired.
Once you’re stocked up with supplies, here’s how to do acrylics at home.
8 Steps for Applying Acrylics
Get everything set up in a well-lit location with good ventilation. Here we go!
Nail prep
As always, it’s essential to properly prepare the natural nails. Even if they’ve been bitten down to the quick, take the time to clean and shape them if possible (since you might not need to trim them).
Dehydrate and prime
Next, use rubbing alcohol and a lint-free wipe or nail dehydrator to remove oil and moisture. Then apply acid-free primer as the base coat.
Put the forms into place on the fingertips if you’re doing extensions
It’s okay to do one finger at a time if you only have one form or mold. Just know that you won’t be able to pull it off until the acrylic has dried.
Make the bead
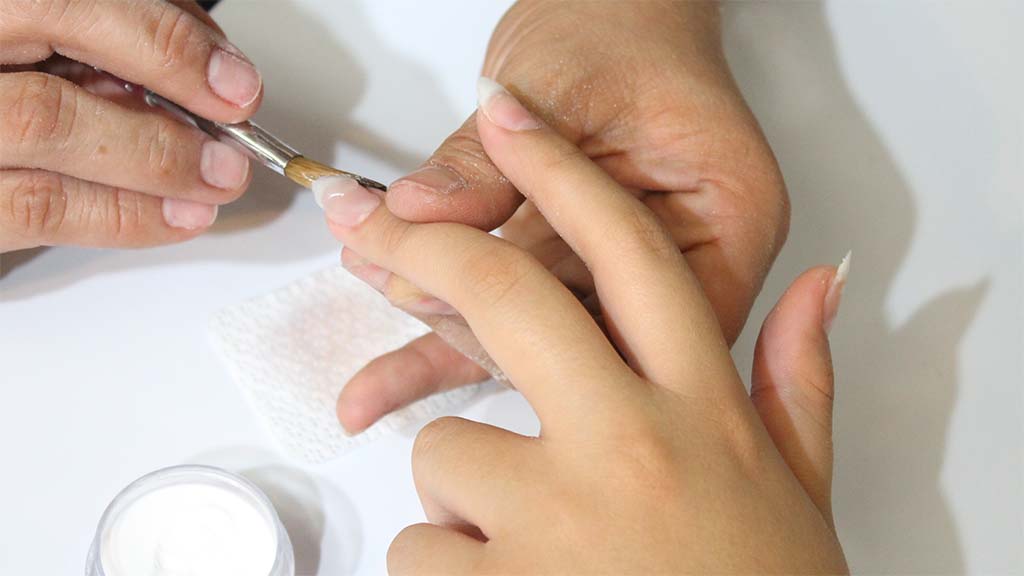
Pour the monomer into the dappen dish and dip the brush in it. Wipe off the excess liquid and press the damp bristles into the acrylic powder. Form a small bead smaller than a pea. This is harder than it sounds and you may need to practice it. Be careful not to get the monomer on your skin because repeated exposure can cause an allergic reaction.
Place the bead onto the natural nail near the cuticle
Use a brush to shape and flatten and work the bead towards the nail tip. Add more if needed. We recommend taking the time to watch a video and practice. You can use a nail form instead of your own nail as a practice dummy.
Allow the acrylic to dry
It takes acrylics about ten minutes to dry. Use the handle end of the brush to tap them. If they click, they are dry.
Shape the acrylics with a file
Use a medium to coarse grit file or a nail drill to perfect the shape of the acrylics. You’ll find that dried acrylic is tougher than the natural nail and it makes a lot of dust. It might be wise to lay down a damp paper towel first.
Apply colored polish if desired and a top coat
Acrylics are compatible with nail lacquer and gel polish, so have fun! Make them as colorful or as subtle as you wish.
Of course, the final step is to clean up your workspace. Don’t pour the leftovers down the drain! Instead, combine a little powder with the liquid residue and let it harden. Then toss it in the trash.
By the way, it’s super easy to clean an acrylic brush. Simply soak it in monomer and wipe it with a lint-free cloth. Then let it dry overnight before storing it.
The Alternative to Acrylics for Bitten Nails
Now, if all of this seems like a lot of work or expense, you can always opt for press-on nails instead. They're a fun alternative that's easy to apply and remove. While they don't last as long as acrylics, they're an excellent option if you're in a hurry or don't have the time to dedicate to a full acrylic manicure. We recommend starting with the ever-popular almond nails or short tips to make the transition more comfortable.
Conclusion
If you're tired of biting your nails and want to have a beautiful, healthy-looking manicure, acrylics may be just the solution you need. With proper care and maintenance, they can help your nails grow and stay strong while looking gorgeous. Check out our new arrivals for trendy colors to enjoy on your next manicure!


